DFM Guidelines for CNC Machining
Design Guidelines for CNC Machining
To help product designers better balance manufacturability and cost-efficiency, this design guide outlines key principles and common practices in CNC machining.
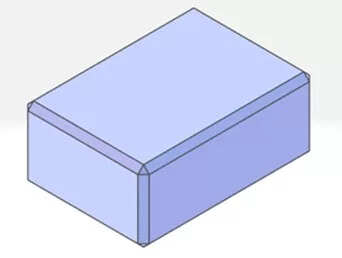
Chamfers
Chamfers not modeled or smaller than C0.5 in 3D files are typically treated as C0.1–0.5 by default.
For chamfers larger than C0.5, please model them explicitly to ensure accurate pricing and processing.
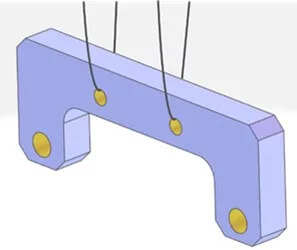
Hanging Hole
Surface treatments like anodizing or trivalent white zinc plating require parts to be suspended in processing fluids.
To ensure proper handling, your model should include at least two hoisting holes designed as follows:
Through-hole ≥ Φ3.5 mm (general tolerance)
Threaded hole ≥ M5
Waist-shaped hole ≥ 5 mm wide
Irregular/slot hole ≥ 3.5 mm wide (general tolerance)
If lifting holes are missing, they may be added manually, which can affect lead time and cost.
Design Guidelines for Holes and Slots
Cavity & Slot Design
For better machinability and reduced cost, cavities should use an inner radius of ≥ R0.5 and a depth within 4× the tool diameter.
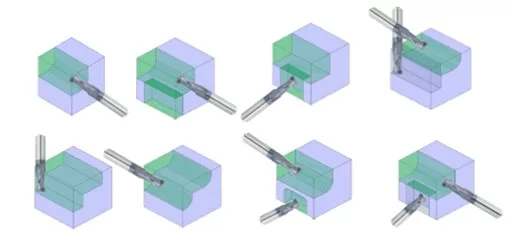
Recommended Groove Shapes
To reduce machining time and cost, prioritize cavity slot shapes with:
Rounded internal corners over sharp angles
Simplified geometry that aligns with end mill movement
Open-ended grooves where possible
These shapes are easier to machine using standard tooling and do not require post-processing or specialized cutting paths.
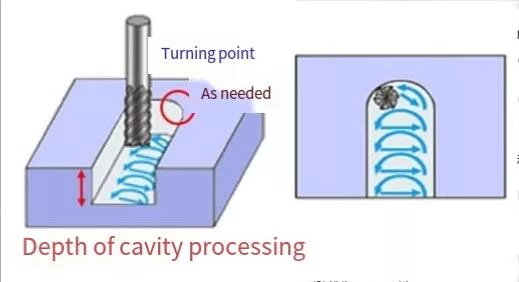
Modeling the Cavity’s R Angle
Always include the inner R radius in your 3D model to reflect real milling cutter behavior.
The larger the radius, the larger the tool diameter allowed, which enables faster and cheaper machining.
Minimum recommended R is R0.5; tighter corners (R<0.5) may need special tools or EDM.
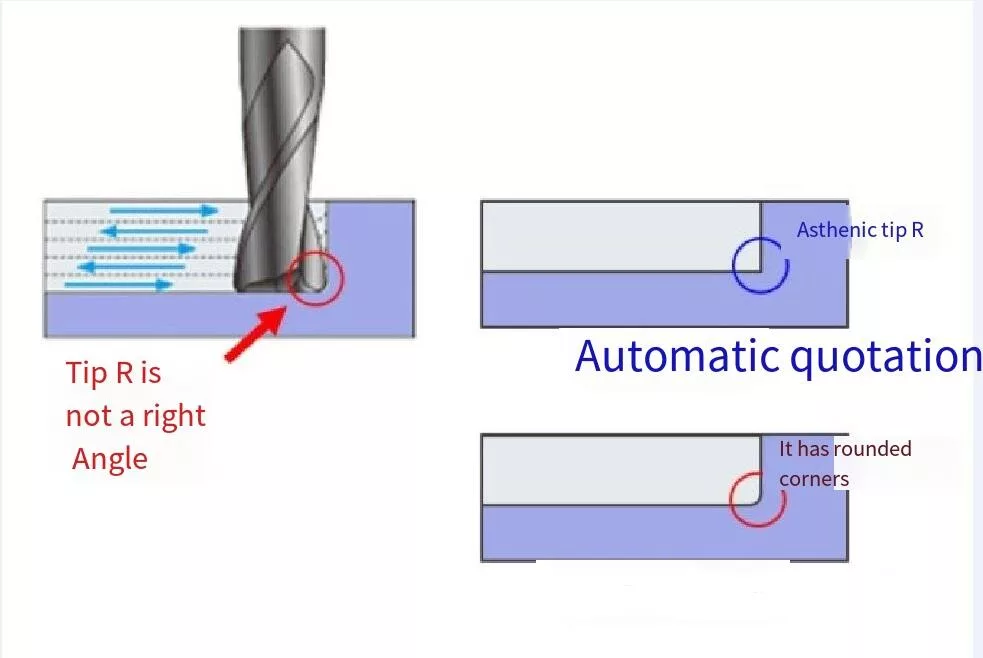
Skip Bottom R Modeling
Do not model the small R radius at the bottom of a cavity caused by the milling tool’s tip.
This radius forms naturally during cutting, and modeling it may mislead toolpath recognition or introduce machining errors.
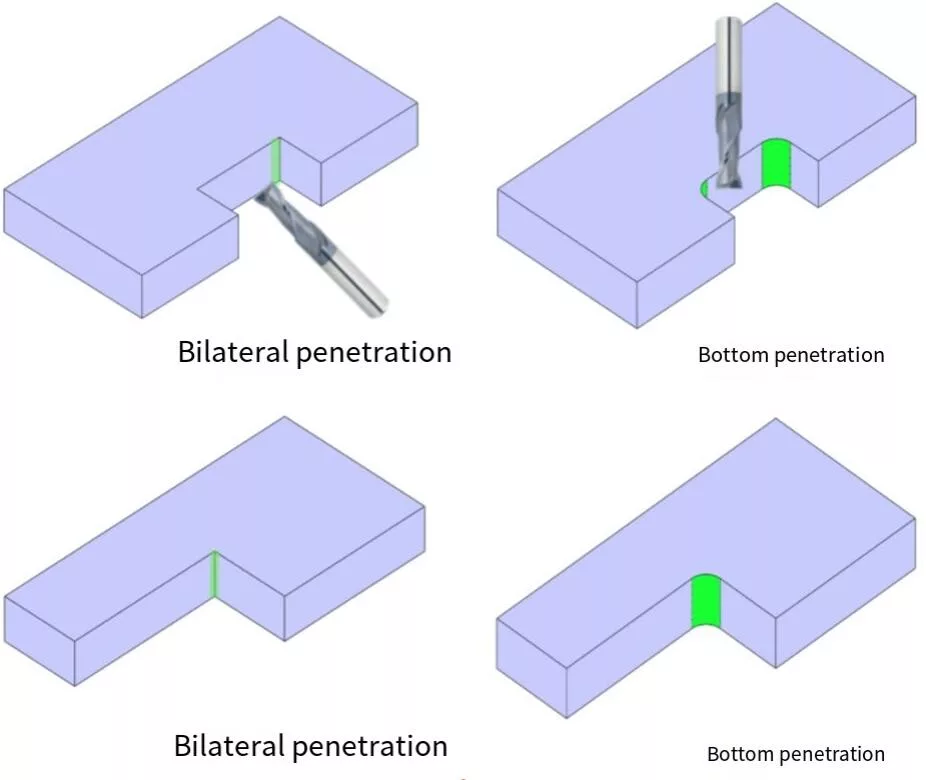
Open-Sided or Bottom-Through Cavities
Grooves that open on at least two sides or the bottom allow for more efficient milling or wire cutting, regardless of internal R size. These designs reduce toolpath complexity and machining time.
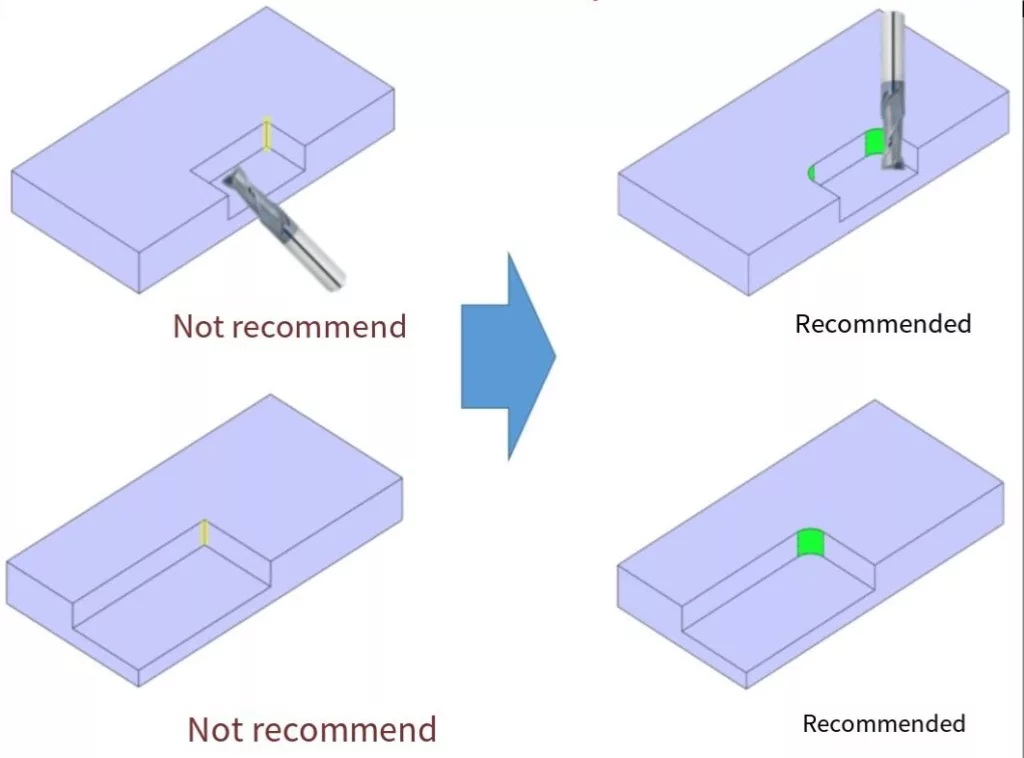
R Radius for Blind Cavities
For non-through cavities, an inner radius of R3 or larger is recommended. Smaller radii like R0.5 are machinable but may increase tooling costs and processing time.
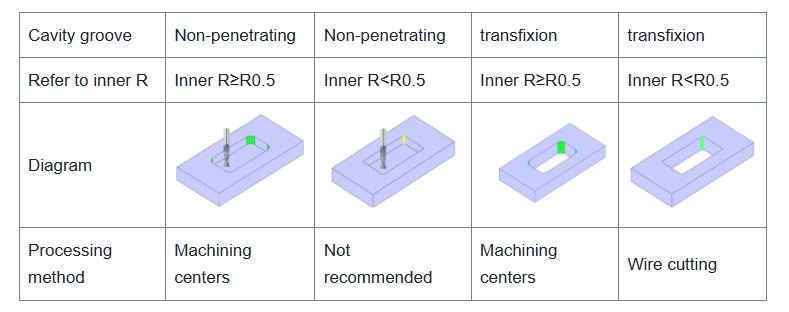
Design Considerations for Closed Cavities
Closed cavities with four enclosed sides and sharp corners are difficult to machine with standard milling tools.
Use a larger internal radius (R ≥ 0.5 mm) or open one side of the cavity to enable faster machining or wire EDM if necessary.
Chamfering Guidelines for Closed Cavities
For internal chamfers in closed cavity features, keep the size at or below C20.
Larger chamfers require specialized tooling and often lead to longer cycle times and higher machining costs.
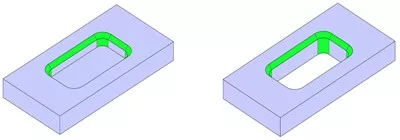
Chamfering at the Mouth of Open Cavities
Avoid designs where both sides of an outer R-angle require chamfering, as they cannot be machined with standard end mills. Keep chamfer size under C20 to reduce cost and complexity.
Special Case
If only one side of the cavity needs chamfering, an end mill can be used—even when the chamfer exceeds C20—as long as tool access is ensured.
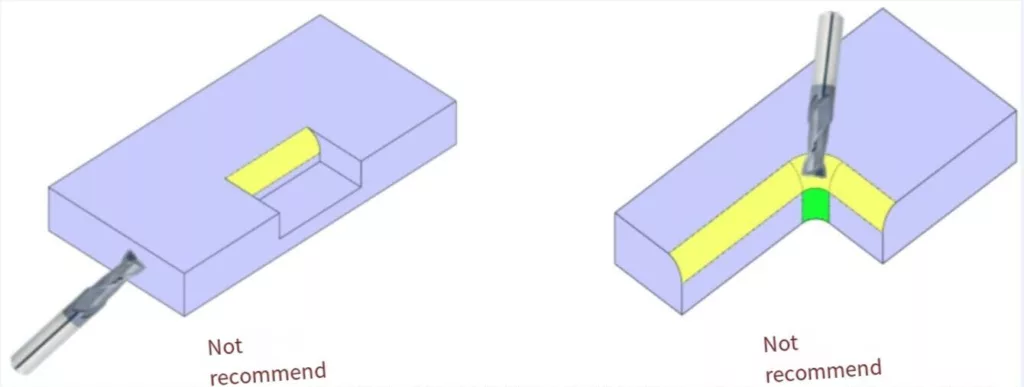

Tips for dimensioning, chamfering, and structuring holes to improve manufacturing efficiency.
Recommendations for the Design of Round Holes
Holes without specified tolerances are typically considered general-purpose straight holes.
For straight holes without precision requirements, drilling is recommended for diameters ≤ Φ20 mm, with a maximum machining depth of 10× the hole diameter.
For straight holes using a milling cutter (Φ ≤ 20 mm), the recommended machining depth is 4× the cutter diameter.
Precision Hole Design Recommendations
For high-precision holes, different methods apply based on diameter:
Φ ≤ 20 mm: Use reaming for finishing; recommended depth is ≤ 5× the hole diameter.
Φ > 20 mm: Use milling + boring, with a suggested depth of ≤ 80 mm.
Tolerances and surface roughness (e.g. Ra 1.6, Rz 6.3) can be specified directly in your 3D model by double-clicking the hole to set properties.
Design Recommendations for Threaded Holes
For both coarse and fine threads, the effective thread depth should generally be kept within 3× the nominal diameter to balance strength, efficiency, and tool life.
Recommended Round Hole Shapes
Waist-shaped holes should have a minimum width of 1 mm, and a depth no greater than 4× the tool diameter.
The diameter of the milling cutter must be equal to or smaller than the waist hole width.
To define precision requirements, double-click the hole specification in your 3D model to apply fit tolerances and surface finish settings (e.g. Ra 1.6 / Rz 6.3).
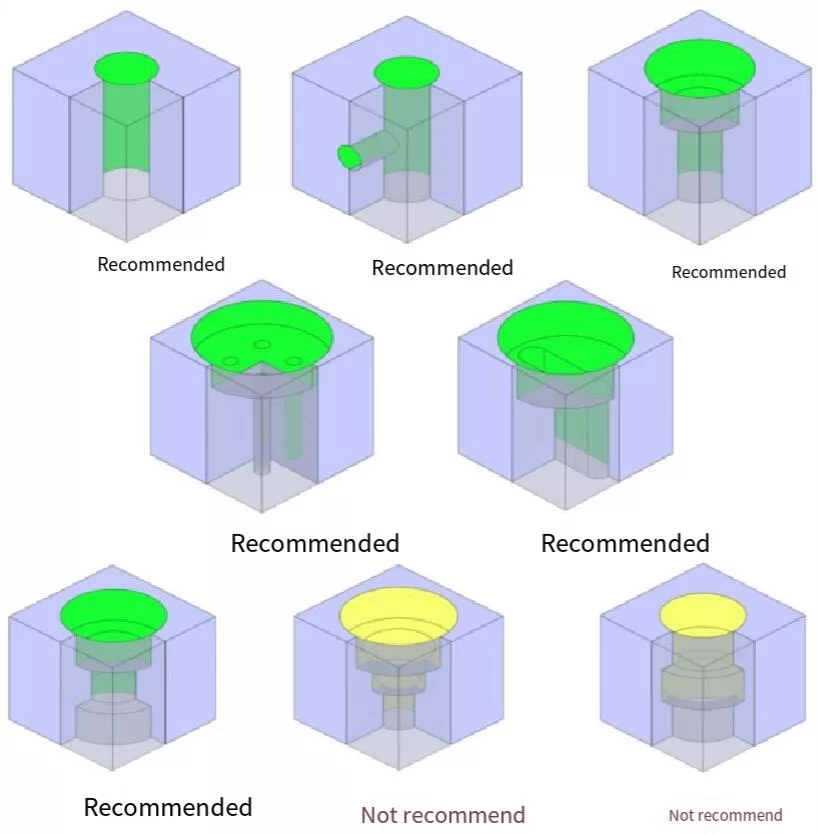
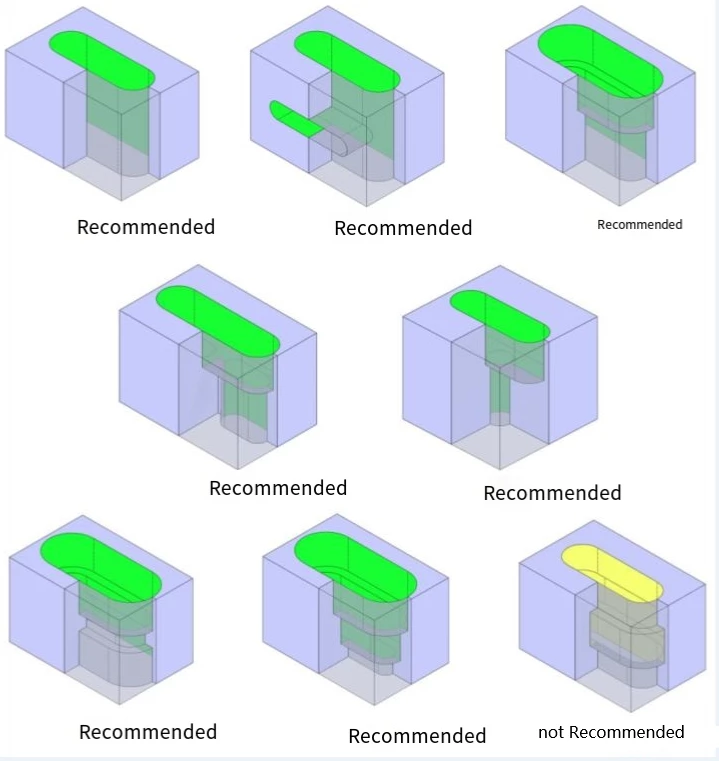
Chamfering at Hole and Slot Openings
For standard holes and waist holes, chamfers should be kept below C20.
Chamfers above this size require special tools that increase cost and cannot be automatically quoted.
To maintain efficiency and compatibility with standard cutters, larger chamfers are generally not recommended.
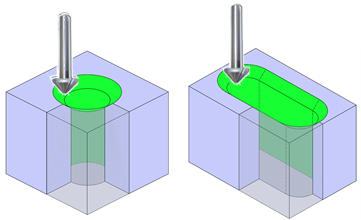
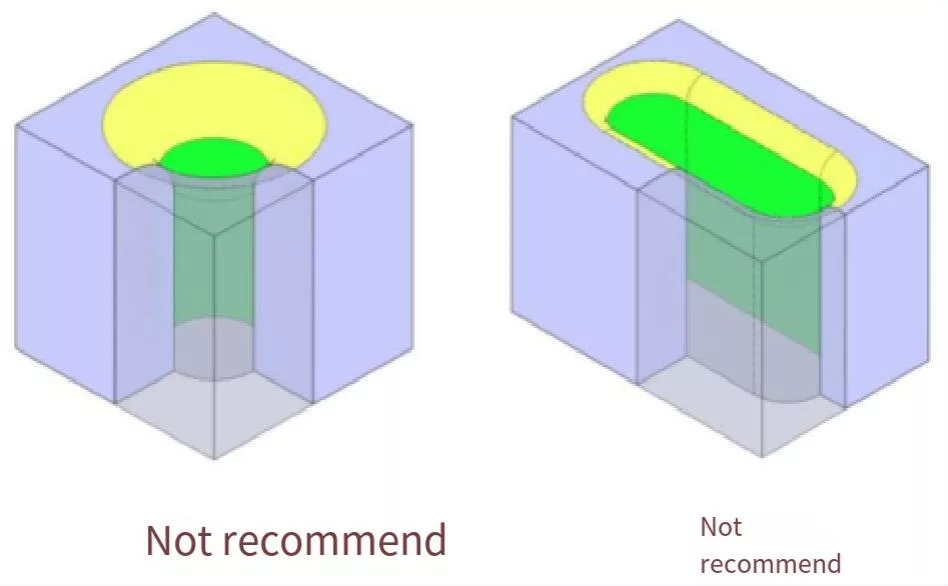
Chamfering in Step Holes
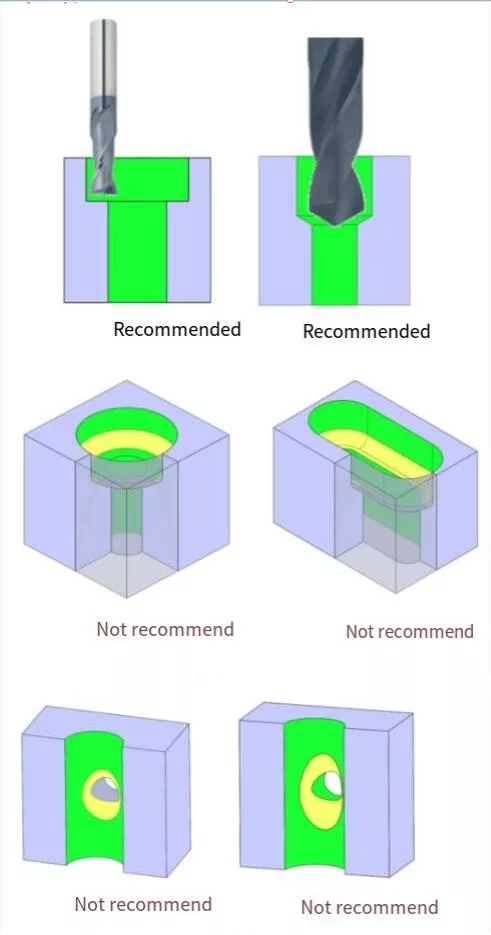
Avoid applying C or R chamfers on stepped surfaces of holes or waist holes.
If chamfering is necessary and the angle exceeds 0.5 mm, special tooling will be required—this may lead to significantly higher machining costs.
For the bottom of precision or threaded holes created by drilling, a 118° drill taper is automatically applied through the “punch” modeling command and will be correctly recognized during quoting.
Thin Wall Conditions in Design
Avoid deformation and ensure structural stability with proper wall thickness design.
Thin Wall Modeling Note
In 3D design, thin walls are often overlooked due to the visual scale of large screen displays.
If any wall section falls below the recommended thickness, it may lead to deformation, breakage, or machining failure.
Our system will automatically flag these risks in the 3D setting interface.
If you choose to proceed with the original design, a manual quotation review will be required.
Thin Walls Between Different Hole Features
When designing multiple features close together—such as straight holes, precision holes, threaded holes, or cavities—ensure the wall thickness between them is not too thin.
Walls that are too narrow may cause distortion, vibration, or breakage during machining.

Minimum Wall Thickness Between Adjacent Features
The distance between straight holes, precision holes, and nearby shape features must meet minimum wall thickness requirements to ensure part strength and machining stability.
Too little material between features can lead to warping, tool vibration, or structural failure.
| diameter | φ2mm or more φ5mm or less | More than φ5mm |
|---|---|---|
| Thin-walled limit | 0.8mm | 1.0mm |
Minimum Wall Thickness Around Threaded Holes
Threaded holes must be positioned far enough from nearby holes, slots, or cavities to maintain structural integrity.
Too thin a wall may cause cracking, thread distortion, or failure during assembly or use.
| diameter | M2 or above M5 or less | M6 or above M10 or less | M12 and above |
|---|---|---|---|
| Thin-walled limit | 0.8mm | 1.0mm | 1.5mm |
Minimum Wall Thickness Around Threaded Sleeves
Threaded sleeves require additional surrounding material due to their larger installation forces and deeper thread engagement.
Ensure enough distance from nearby features to avoid cracking, thread pullout, or deformation during use.
| diameter | M2 or above M5 or less | M6 or above M10 or less | M12 |
|---|---|---|---|
| Thin-walled limit | 2.0mm | 3.9mm | 1.5mm |
Minimum Wall Thickness Around Counterbores
Counterbores create deep, flat-bottomed holes that remove more material than standard holes.
Maintain sufficient spacing from adjacent features to prevent wall collapse, tool deflection, or loss of structural strength.

Minimum Wall Thickness Beneath Counterbores
Ensure sufficient material below the bottom surface of a counterbore when it’s close to underlying holes, cavities, or outer walls.
Too little thickness may lead to breakthrough, warping, or compromised part strength.
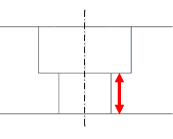
| Diameter (D, d) | φ3 or more φ6 or less | More than φ6 |
|---|---|---|
| Thin-walled limit | 0.8mm | 1.0mm |
Minimum Thickness Below Hole Bottoms
Always leave enough material beneath the bottom of holes—especially when close to other features such as cavities, slots, or outer walls.
Too little thickness may result in drill-through, cracks, or loss of sealing integrity.
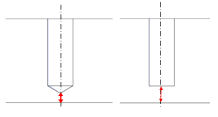
| Thin-walled limit | 2.0mm |
Wall Thickness Around Waist Holes
Waist-shaped holes (elongated slots) require additional spacing from nearby features due to their extended cutting paths.
Thin material between a waist hole and other geometry can lead to distortion, tool deflection, or inaccurate edges.
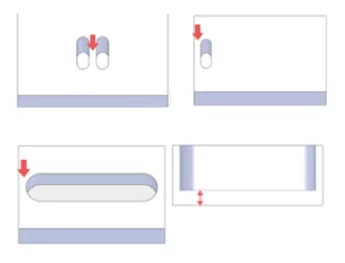
| Thin-walled limit | 1.0mm |
Minimum Wall Thickness Around Cavities
When designing deep or complex cavities, ensure there’s enough wall thickness between the cavity and other features.
Insufficient spacing may cause wall collapse, vibration, or surface defects during machining.
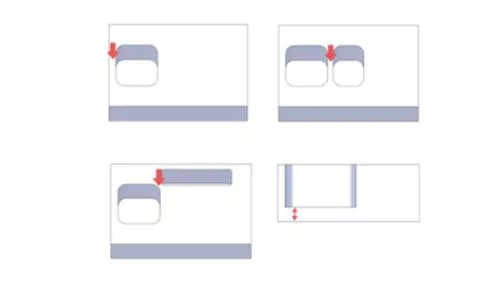
| Thin-walled limit | 1.0mm |
Design vs. Final Part: Key Differences
Note on Model vs. Machined Part Differences
While production is based on your 3D CAD model, there are certain situations where the finished part may differ slightly from the design due to machining constraints or tool geometry.
Below are common cases where such differences may occur.
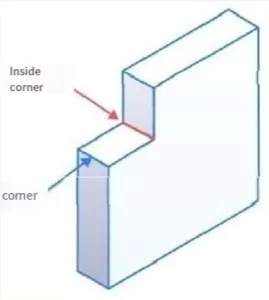
Small Chamfers and Corner Radii
If sharp inner or outer corners are modeled without a defined fillet or chamfer, the finished part will typically include a small default radius or chamfer in the range of C0.1 to C0.5 mm.
This adjustment ensures smoother toolpaths and avoids sharp edges that may be unmachinable or fragile.
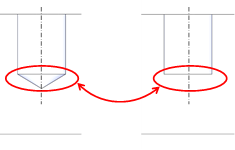
Blind Hole Bottom Shapes
Blind holes may be machined with a flat or conical bottom (typically 118°), depending on size and tolerance.
If the bottom shape is not clearly defined, MachMaster will apply the most suitable method automatically. Model the hole bottom explicitly if a specific shape is required.
Manage Your Machining Needs with MachMaster
Tell Us What You Need
At MachMaster, our engineers review every request and respond with tailored solutions.
Your files are kept strictly confidential and will only be used for quoting and manufacturing purposes.
- info@machcncmaster.com
- +86 139 5006 6486
